KubeStellar-Syncer
![]()
Required Packages for running and using KubeStellar:
You will need the following tools to deploy and use KubeStellar. Select the tab for your environment for suggested commands to install them
-
curl (omitted from most OS-specific instructions)
-
kubectl (version range expected: 1.23-1.25)
-
helm (required when deploying as workload)
If you intend to build kubestellar from source you will also need
-
go (Go version >=1.19 required; 1.19 recommended) [go releases] (https://go.dev/dl)
-
for simplicity, here's a direct link to go releases Remember you need go v1.19 or greater; 1.19 recommended!
brew install kubectl
-
Download the package from https://go.dev/dl#go1.19 Be sure to get the correct one for your architecture
-
Open the package file you downloaded and follow the prompts to install Go. The package installs the Go distribution to /usr/local/go. The package should put the /usr/local/go/bin directory in your PATH environment variable. You may need to restart any open Terminal sessions for the change to take effect.
-
Verify that you've installed Go by opening a command prompt and typing the following command:
$ go versionConfirm that the command prints the desired installed version of Go.
curl -LO "https://dl.k8s.io/release/$(curl -L -s https://dl.k8s.io/release/stable.txt)/bin/linux/$(dpkg --print-architecture)/kubectl" && chmod +x kubectl && sudo mv ./kubectl /usr/local/bin/kubectl
curl https://baltocdn.com/helm/signing.asc | gpg --dearmor | sudo tee /usr/share/keyrings/helm.gpg > /dev/null
sudo apt-get install apt-transport-https --yes
echo "deb [arch=$(dpkg --print-architecture) signed-by=/usr/share/keyrings/helm.gpg] https://baltocdn.com/helm/stable/debian/ all main" | sudo tee /etc/apt/sources.list.d/helm-stable-debian.list
sudo apt-get update
sudo apt-get install helm
visit https://go.dev/doc/install for latest instructions
-
Remove any previous Go installation by deleting the /usr/local/go folder (if it exists), then extract the archive you just downloaded into /usr/local, creating a fresh Go tree in /usr/local/go:
$ rm -rf /usr/local/go && tar -C /usr/local -xzf go1.21.3.linux-amd64.tar.gz(You may need to run the command as root or through sudo).
Do not untar the archive into an existing /usr/local/go tree. This is known to produce broken Go installations.
-
Add /usr/local/go/bin to the PATH environment variable. You can do this by adding the following line to your $HOME/.profile or /etc/profile (for a system-wide installation):
export PATH=$PATH:/usr/local/go/binNote: Changes made to a profile file may not apply until the next time you log into your computer. To apply the changes immediately, just run the shell commands directly or execute them from the profile using a command such as source $HOME/.profile.
-
Verify that you've installed Go by opening a command prompt and typing the following command:
$ go version -
Confirm that the command prints the installed version of Go.
# For AMD64 / x86_64
[ $(uname -m) = x86_64 ] && curl -LO "https://dl.k8s.io/release/$(curl -L -s https://dl.k8s.io/release/stable.txt)/bin/linux/amd64/kubectl" && chmod +x kubectl && mv ./kubectl /usr/local/bin/kubectl
# for ARM64 / aarch64
[ $(uname -m) = aarch64 ] && curl -LO "https://dl.k8s.io/release/$(curl -L -s https://dl.k8s.io/release/stable.txt)/bin/linux/arm64/kubectl" && chmod +x kubectl && mv ./kubectl /usr/local/bin/kubectl
visit https://go.dev/doc/install for latest instructions
-
Remove any previous Go installation by deleting the /usr/local/go folder (if it exists), then extract the archive you just downloaded into /usr/local, creating a fresh Go tree in /usr/local/go:
$ rm -rf /usr/local/go && tar -C /usr/local -xzf go1.21.3.linux-amd64.tar.gz(You may need to run the command as root or through sudo).
Do not untar the archive into an existing /usr/local/go tree. This is known to produce broken Go installations.
-
Add /usr/local/go/bin to the PATH environment variable. You can do this by adding the following line to your $HOME/.profile or /etc/profile (for a system-wide installation):
export PATH=$PATH:/usr/local/go/binNote: Changes made to a profile file may not apply until the next time you log into your computer. To apply the changes immediately, just run the shell commands directly or execute them from the profile using a command such as source $HOME/.profile.
-
Verify that you've installed Go by opening a command prompt and typing the following command:
$ go version -
Confirm that the command prints the installed version of Go.
Set-ExecutionPolicy Bypass -Scope Process -Force; [System.Net.ServicePointManager]::SecurityProtocol = [System.Net.ServicePointManager]::SecurityProtocol -bor 3072; iex ((New-Object System.Net.WebClient).DownloadString('https://community.chocolatey.org/install.ps1'))
curl.exe -LO "https://dl.k8s.io/release/v1.27.2/bin/windows/amd64/kubectl.exe"
choco install kubernetes-helm
visit https://go.dev/doc/install for latest instructions
-
Download the go 1.19 MSI package from https://go.dev/dl#go1.19 Be sure to get the correct one for your architecture
-
Open the MSI file you downloaded and follow the prompts to install Go.
By default, the installer will install Go to Program Files or Program Files (x86). You can change the location as needed. After installing, you will need to close and reopen any open command prompts so that changes to the environment made by the installer are reflected at the command prompt.
-
Verify that you've installed Go:
-
In Windows, click the Start menu.
-
In the menu's search box, type cmd, then press the Enter key.
-
In the Command Prompt window that appears, type the following command:
$ go version -
Confirm that the command prints the installed version of Go.
-
How to install pre-requisites for a Windows Subsystem for Linux (WSL) envronment using an Ubuntu 22.04.01 distribution
(Tested on a Intel(R) Core(TM) i7-9850H CPU @ 2.60GHz 2.59 GHz with 32GB RAM, a 64-bit operating system, x64-based processor Using Windows 11 Enterprise)
1. If you're using a VPN, turn it off
2. Install Ubuntu into WSL
2.0 If wsl is not yet installed, open a powershell administrator window and run the following
2.1 reboot your system
2.2 In a Windows command terminal run the following to list all the linux distributions that are available online
2.3 Select a linux distribution and install it into WSL
You will see something like:Installing, this may take a few minutes...
Please create a default UNIX user account. The username does not need to match your Windows username.
For more information visit: https://aka.ms/wslusers
Enter new UNIX username:
2.4 Enter your new username and password at the prompts, and you will eventually see something like:
2.5 Click on the Windows "Start" icon and type in the name of your distribution into the search box. Your new linux distribution should appear as a local "App". You can pin it to the Windows task bar or to Start for your future convenience.
Start a VM using your distribution by clicking on the App.3. Install pre-requisites into your new VM
3.1 update and apply apt-get packages
3.2 Install golang
wget https://golang.org/dl/go1.19.linux-amd64.tar.gz
sudo tar -zxvf go1.19.linux-amd64.tar.gz -C /usr/local
echo export GOROOT=/usr/local/go | sudo tee -a /etc/profile
echo export PATH="$PATH:/usr/local/go/bin" | sudo tee -a /etc/profile
source /etc/profile
go version
3.3 Install ko (but don't do ko set action step)
3.4 Install gcc
Either run this: or this:3.5 Install make (if you installed build-essential this may already be installed)
3.6 Install jq
3.7 install kubectl
curl -LO "https://dl.k8s.io/release/$(curl -L -s https://dl.k8s.io/release/stable.txt)/bin/linux/amd64/kubectl"
curl -LO "https://dl.k8s.io/$(curl -L -s https://dl.k8s.io/release/stable.txt)/bin/linux/amd64/kubectl.sha256"
echo "$(cat kubectl.sha256)  kubectl" | sha256sum --check
sudo install -o root -g root -m 0755 kubectl /usr/local/bin/kubectl
3.8 install helm (required when deploying as workload)
Required Packages for the example usage:
You will need the following tools for the example usage of KubeStellar in this quickstart example. Select the tab for your environment for suggested commands to install them
sudo mkdir -p /etc/apt/keyrings
curl -fsSL https://download.docker.com/linux/ubuntu/gpg | sudo gpg --dearmor -o /etc/apt/keyrings/docker.gpg
echo "deb [arch=$(dpkg --print-architecture) signed-by=/etc/apt/keyrings/docker.gpg] https://download.docker.com/linux/ubuntu $(lsb_release -cs) stable" | sudo tee /etc/apt/sources.list.d/docker.list > /dev/null
sudo apt update
sudo apt-get install -y docker-ce docker-ce-cli containerd.io docker-compose-plugin
# Add Docker's official GPG key:
sudo apt-get update
sudo apt-get install ca-certificates curl gnupg
sudo install -m 0755 -d /etc/apt/keyrings
curl -fsSL https://download.docker.com/linux/debian/gpg | sudo gpg --dearmor -o /etc/apt/keyrings/docker.gpg
sudo chmod a+r /etc/apt/keyrings/docker.gpg

# Add the repository to Apt sources:
echo \
  "deb [arch="$(dpkg --print-architecture)" signed-by=/etc/apt/keyrings/docker.gpg] https://download.docker.com/linux/debian \
  "$(. /etc/os-release && echo "$VERSION_CODENAME")" stable" | \
  sudo tee /etc/apt/sources.list.d/docker.list > /dev/null
sudo apt-get update

# Install packages
sudo apt-get install docker-ce docker-ce-cli containerd.io docker-buildx-plugin docker-compose-plugin
yum -y install epel-release && yum -y install docker && systemctl enable --now docker && systemctl status docker
# For AMD64 / x86_64
[ $(uname -m) = x86_64 ] && curl -Lo ./kind https://kind.sigs.k8s.io/dl/v0.14.0/kind-linux-amd64
# For ARM64
[ $(uname -m) = aarch64 ] && curl -Lo ./kind https://kind.sigs.k8s.io/dl/v0.14.0/kind-linux-arm64
chmod +x ./kind && sudo mv ./kind /usr/local/bin/kind
How to install docker and kind into a Windows Subsystem for Linux (WSL) environment using an Ubuntu 22.04.01 distribution
1.0 Start a VM terminal by clicking on the App you configured using the instructions in the General pre-requisites described above.
2.0 Install docker
The installation instructions from docker are not sufficient to get docker working with WSL2.1 Follow instructions here to install docker https://docs.docker.com/engine/install/ubuntu/
Here some additional steps you will need to take:
2.2 Ensure that /etc/wsl.conf is configured so that systemd will run on booting.
If /etc/wsl.conf does not contain [boot] systemd=true, then edit /etc/wsl.com as follows: Insert2.3 Edit /etc/sudoers: it is strongly recommended to not add directives directly to /etc/sudoers, but instead to put them in files in /etc/sudoers.d which are auto-included. So make/modify a new file via
Insert2.4 Add your user to the docker group
2.5 If dockerd is already running, then stop it and restart it as follows (note: the new dockerd instance will be running in the foreground):
2.5.1 If you encounter an iptables issue, which is described here: https://github.com/microsoft/WSL/issues/6655 The following commands will fix the issue:
sudo update-alternatives --set iptables /usr/sbin/iptables-legacy
sudo update-alternatives --set ip6tables /usr/sbin/ip6tables-legacy
sudo dockerd &
3. You will now need to open new terminals to access the VM since dockerd is running in the foreground of this terminal
3.1 In your new terminal, install kind
This document is 'docs-ecutable' - you can 'run' this document, just like we do in our testing, on your local environment
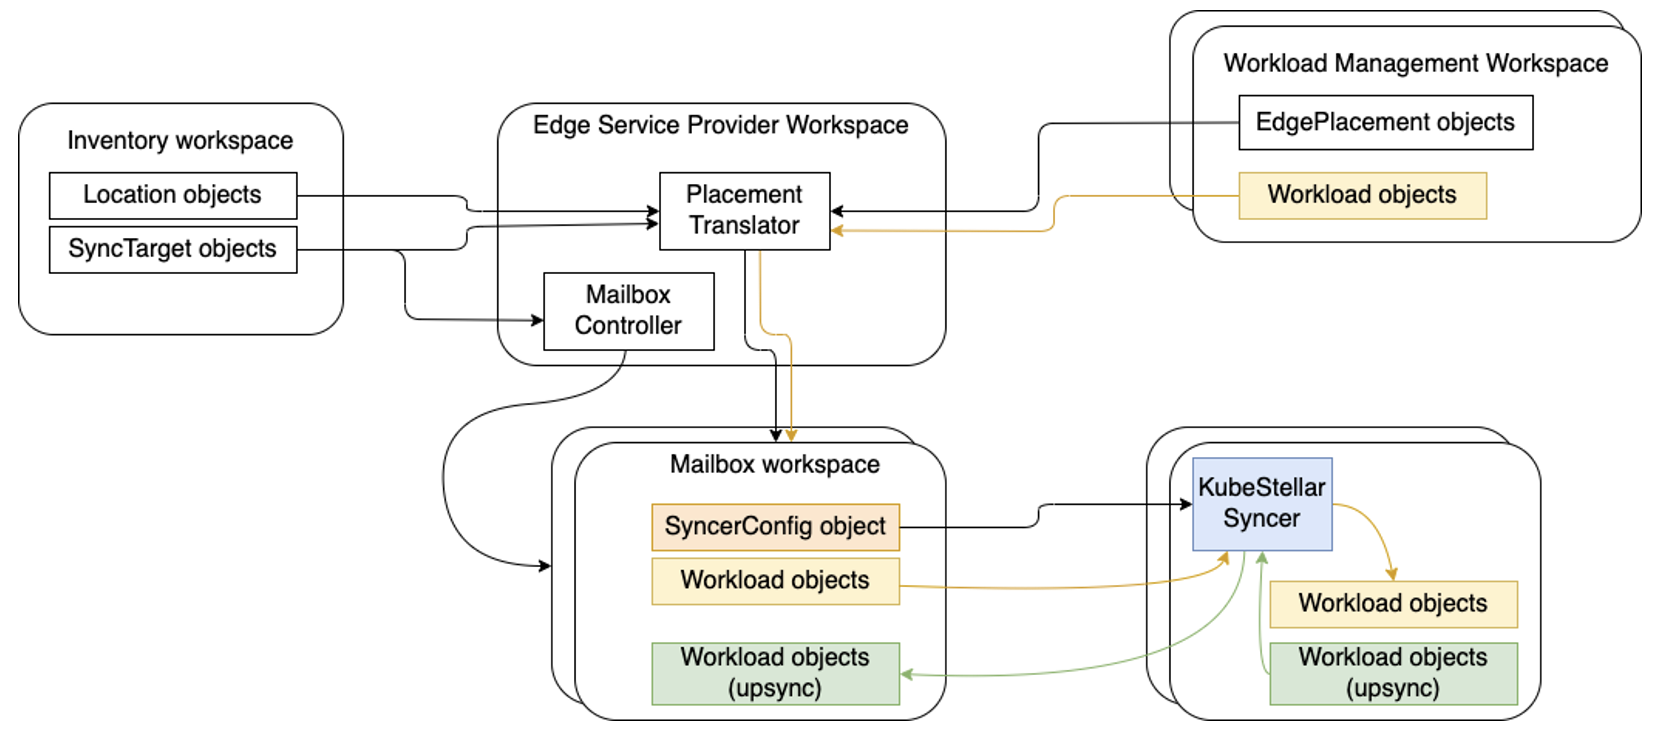
KubeStellar-Syncer runs in the target cluster and sync kubernetes resource objects from the target cluster to a mailbox workspace and vice versa.
Steps to try the Syncer#
The KubeStellar-Syncer can be exercised after setting up KubeStellar mailbox workspaces. Firstly we'll follow to similar steps in example1 until The mailbox controller in stage 2.

Stage 1 creates the infrastructure and the edge service provider workspace (ESPW) and lets that react to the inventory. Then the KubeStellar syncers are deployed, in the edge clusters and configured to work with the corresponding mailbox workspaces. This stage has the following steps.
Create two kind clusters.#
This example uses two kind clusters as edge clusters. We will call them "florin" and "guilder".
This example uses extremely simple workloads, which
use hostPort networking in Kubernetes. To make those ports easily
reachable from your host, this example uses an explicit kind
configuration for each edge cluster.
For the florin cluster, which will get only one workload, create a
file named florin-config.yaml with the following contents. In a
kind config file, containerPort is about the container that is
also a host (a Kubernetes node), while the hostPort is about the
host that hosts that container.
cat > florin-config.yaml << EOF
kind: Cluster
apiVersion: kind.x-k8s.io/v1alpha4
nodes:
- role: control-plane
  extraPortMappings:
  - containerPort: 8081
    hostPort: 8094
EOF
For the guilder cluster, which will get two workloads, create a file
named guilder-config.yaml with the following contents. The workload
that uses hostPort 8081 goes in both clusters, while the workload that
uses hostPort 8082 goes only in the guilder cluster.
cat > guilder-config.yaml << EOF
kind: Cluster
apiVersion: kind.x-k8s.io/v1alpha4
nodes:
- role: control-plane
  extraPortMappings:
  - containerPort: 8081
    hostPort: 8096
  - containerPort: 8082
    hostPort: 8097
EOF
Finally, create the two clusters with the following two commands,
paying attention to $KUBECONFIG and, if that's empty,
~/.kube/config: kind create will inject/replace the relevant
"context" in your active kubeconfig.
kind create cluster --name florin --config florin-config.yaml
kind create cluster --name guilder --config guilder-config.yaml
Deploy kcp and KubeStellar#
You need kcp and KubeStellar and can deploy them in either of two ways: as bare processes on whatever host you are using to run this example, or as workload in a Kubernetes cluster (an OpenShift cluster qualifies). Do one or the other, not both.
KubeStellar only works with release v0.11.0 of kcp. To downsync ServiceAccount objects you will need a patched version of that in order to get the denaturing of them as discussed in the design outline.
Deploy kcp and KubeStellar as bare processes#
Start kcp#
The following commands fetch the appropriate kcp server and plugins for your OS and ISA and download them and put them on your $PATH.
rm -rf kcp
mkdir kcp
pushd kcp
(
  set -x
  case "$OSTYPE" in
      linux*)   os_type="linux" ;;
      darwin*)  os_type="darwin" ;;
      *)        echo "Unsupported operating system type: $OSTYPE" >&2
                false ;;
  esac
  case "$HOSTTYPE" in
      x86_64*)  arch_type="amd64" ;;
      aarch64*) arch_type="arm64" ;;
      arm64*)   arch_type="arm64" ;;
      *)        echo "Unsupported architecture type: $HOSTTYPE" >&2
                false ;;
  esac
  kcp_version=v0.11.0
  trap "rm kcp.tar.gz kcp-plugins.tar.gz" EXIT
  curl -SL -o kcp.tar.gz "https://github.com/kubestellar/kubestellar/releases/download/v0.12.0/kcp_0.11.0_${os_type}_${arch_type}.tar.gz"
  curl -SL -o kcp-plugins.tar.gz "https://github.com/kcp-dev/kcp/releases/download/${kcp_version}/kubectl-kcp-plugin_${kcp_version//v}_${os_type}_${arch_type}.tar.gz"
  tar -xzf kcp-plugins.tar.gz
  tar -xzf kcp.tar.gz
)
export PATH=$(pwd)/bin:$PATH
Running the kcp server creates a hidden subdirectory named .kcp to
hold all sorts of state related to the server. If you have run it
before and want to start over from scratch then you should rm -rf
.kcp first.
Use the following commands to: (a) run the kcp server in a forked
command, (b) update your KUBECONFIG environment variable to
configure kubectl to use the kubeconfig produced by the kcp server,
and (c) wait for the kcp server to get through some
initialization. The choice of -v=3 for the kcp server makes it log a
line for every HTTP request (among other things).
kcp start -v=3 &> /tmp/kcp.log &
export KUBECONFIG=$(pwd)/.kcp/admin.kubeconfig
popd
# wait until KCP is ready checking availability of ws resource
while ! kubectl ws tree &> /dev/null; do
  sleep 10
done
Note that you now care about two different kubeconfig files: the one
that you were using earlier, which holds the contexts for your kind
clusters, and the one that the kcp server creates. The remainder of
this document assumes that your kind cluster contexts are in
~/.kube/config.
Get KubeStellar#
You will need a local copy of KubeStellar. You can either use the pre-built archive (containing executables and config files) from a release or get any desired version from GitHub and build.
Use pre-built archive#
Fetch the archive for your operating system and instruction set
architecture as follows, in which $kubestellar_version is your
chosen release of KubeStellar (see the releases on
GitHub) and
$os_type and $arch_type are chosen according to the list of
"assets" for your chosen release.
curl -SL -o kubestellar.tar.gz "https://github.com/kubestellar/kubestellar/releases/download/${kubestellar_version}/kubestellar_${kubestellar_version}_${os_type}_${arch_type}.tar.gz
tar xzf kubestellar.tar.gz
export PATH=$PWD/bin:$PATH
Get from GitHub#
You can get the latest version from GitHub with the following command,
which will get you the default branch (which is named "main"); add -b
$branch to the git command in order to get a different branch.
Use the following commands to build and add the executables to your
$PATH.
In the following exhibited command lines, the commands described as
"KubeStellar commands" and the commands that start with kubectl
kubestellar rely on the KubeStellar bin directory being on the
$PATH. Alternatively you could invoke them with explicit pathnames.
The kubectl plugin lines use fully specific executables (e.g.,
kubectl kubestellar prep-for-syncer corresponds to
bin/kubectl-kubestellar-prep_for_syncer).
Initialize the KubeStellar platform as bare processes#
In this step KubeStellar creates and populates the Edge Service
Provider Workspace (ESPW), which exports the KubeStellar API, and also
augments the root:compute workspace from kcp TMC as needed here.
That augmentation consists of adding authorization to update the
relevant /status and /scale subresources (missing in kcp TMC) and
extending the supported subset of the Kubernetes API for managing
containerized workloads from the four resources built into kcp TMC
(Deployment, Pod, Service, and Ingress) to the other ones that
are meaningful in KubeStellar.
Deploy kcp and KubeStellar as a workload in a Kubernetes cluster#
(This style of deployment requires release v0.6 or later of KubeStellar.)
You need a Kubernetes cluster; see the documentation for kubectl kubestellar deploy for more information.
You will need a domain name that, on each of your clients, resolves to an IP address that the client can use to open a TCP connection to the Ingress controller's listening socket.
You will need the kcp kubectl plugins. See the "Start kcp" section
above for instructions on how to get all of the kcp
executables.
You will need to get a build of KubeStellar. See above.
To do the deployment and prepare to use it you will be using the
commands defined for
that. These
require your shell to be in a state where kubectl manipulates the
hosting cluster (the Kubernetes cluster into which you want to deploy
kcp and KubeStellar), either by virtue of having set your KUBECONFIG
envar appropriately or putting the relevant contents in
~/.kube/config or by passing --kubeconfig explicitly on the
following command lines.
Use the kubectl kubestellar deploy command to do the deployment.
Then use the kubectl kubestellar get-external-kubeconfig
command to put
into a file the kubeconfig that you will use as a user of kcp and
KubeStellar. Do not overwrite the kubeconfig file for your hosting
cluster. But do update your KUBECONFIG envar setting or remember
to pass the new file with --kubeconfig on the command lines when
using kcp or KubeStellar. For example, you might use the following
commands to fetch and start using that kubeconfig file; the first
assumes that you deployed the core into a Kubernetes namespace named
"kubestellar".
kubectl kubestellar get-external-kubeconfig -n kubestellar -o kcs.kubeconfig
export KUBECONFIG=$(pwd)/kcs.kubeconfig
Note that you now care about two different kubeconfig files: the one
that you were using earlier, which holds the contexts for your kind
clusters, and the one that you just fetched and started using for
working with the KubeStellar interface. The remainder of this document
assumes that your kind cluster contexts are in ~/.kube/config.
Create SyncTarget and Location objects to represent the florin and guilder clusters#
Use the following two commands to put inventory objects in the IMW at
root:imw1 that was automatically created during deployment of
KubeStellar. They label both florin and guilder with env=prod, and
also label guilder with extended=yes.
kubectl ws root:imw1
kubectl kubestellar ensure location florin  loc-name=florin  env=prod
kubectl kubestellar ensure location guilder loc-name=guilder env=prod extended=yes
echo "decribe the florin location object"
kubectl describe location.edge.kubestellar.io florin
Those two script invocations are equivalent to creating the following
four objects plus the kcp APIBinding objects that import the
definition of the KubeStellar API.
apiVersion: edge.kubestellar.io/v2alpha1
kind: SyncTarget
metadata:
  name: florin
  labels:
    id: florin
    loc-name: florin
    env: prod
---
apiVersion: edge.kubestellar.io/v2alpha1
kind: Location
metadata:
  name: florin
  labels:
    loc-name: florin
    env: prod
spec:
  resource: {group: edge.kubestellar.io, version: v2alpha1, resource: synctargets}
  instanceSelector:
    matchLabels: {id: florin}
---
apiVersion: edge.kubestellar.io/v2alpha1
kind: SyncTarget
metadata:
  name: guilder
  labels:
    id: guilder
    loc-name: guilder
    env: prod
    extended: yes
---
apiVersion: edge.kubestellar.io/v2alpha1
kind: Location
metadata:
  name: guilder
  labels:
    loc-name: guilder
    env: prod
    extended: yes
spec:
  resource: {group: edge.kubestellar.io, version: v2alpha1, resource: synctargets}
  instanceSelector:
    matchLabels: {id: guilder}
That script also deletes the Location named default, which is not
used in this PoC, if it shows up.
The mailbox controller#
The mailbox controller is one of the central controllers of KubeStellar. If you have deployed the KubeStellar core as Kubernetes workload then this controller is already running in a pod in your hosting cluster. If instead you are running these controllers as bare processes then launch this controller as follows.
This controller is in charge of maintaining the collection of mailbox
workspaces, which are an implementation detail not intended for user
consumption. You can use the following command to wait for the
appearance of the mailbox workspaces implied by the florin and guilder
SyncTarget objects that you made earlier.
If it is working correctly, lines like the following will appear in the controller's log (which is being written into your shell if you ran the controller as a bare process above, otherwise you can fetch as directed).
...
I0721 17:37:10.186848  189094 main.go:206] "Found APIExport view" exportName="e
dge.kubestellar.io" serverURL="https://10.0.2.15:6443/services/apiexport/cseslli1ddit3s
a5/edge.kubestellar.io"
...
I0721 19:17:21.906984  189094 controller.go:300] "Created APIBinding" worker=1
mbwsName="1d55jhazpo3d3va6-mb-551bebfd-b75e-47b1-b2e0-ff0a4cb7e006" mbwsCluster
="32x6b03ixc49cj48" bindingName="bind-edge" resourceVersion="1247"
...
I0721 19:18:56.203057  189094 controller.go:300] "Created APIBinding" worker=0
mbwsName="1d55jhazpo3d3va6-mb-732cf72a-1ca9-4def-a5e7-78fd0e36e61c" mbwsCluster
="q31lsrpgur3eg9qk" bindingName="bind-edge" resourceVersion="1329"
^C
You need a -v setting of 2 or numerically higher to get log messages
about individual mailbox workspaces.
A mailbox workspace name is distinguished by -mb- separator.
You can get a listing of those mailbox workspaces as follows.
NAME                                                       TYPE          REGION   PHASE   URL                                                     AGE
1t82bk54r6gjnzsp-mb-1a045336-8178-4026-8a56-5cd5609c0ec1   universal              Ready   https://192.168.58.123:6443/clusters/1najcltzt2nqax47   50s
1t82bk54r6gjnzsp-mb-f0a82ab1-63f4-49ea-954d-3a41a35a9f1c   universal              Ready   https://192.168.58.123:6443/clusters/1y7wll1dz806h3sb   50s
compute                                                    universal              Ready   https://172.20.144.39:6443/clusters/root:compute        6m8s
espw                                                       organization           Ready   https://172.20.144.39:6443/clusters/root:espw           2m4s
imw1                                                       organization           Ready   https://172.20.144.39:6443/clusters/root:imw1           1m9s
More usefully, using custom columns you can get a listing that shows the name of the associated SyncTarget.
kubectl get Workspace -o "custom-columns=NAME:.metadata.name,SYNCTARGET:.metadata.annotations['edge\.kubestellar\.io/sync-target-name'],CLUSTER:.spec.cluster"
NAME                                                       SYNCTARGET   CLUSTER
1t82bk54r6gjnzsp-mb-1a045336-8178-4026-8a56-5cd5609c0ec1   florin       1najcltzt2nqax47
1t82bk54r6gjnzsp-mb-f0a82ab1-63f4-49ea-954d-3a41a35a9f1c   guilder      1y7wll1dz806h3sb
compute                                                    <none>       mqnl7r5f56hswewy
espw                                                       <none>       2n88ugkhysjbxqp5
imw1                                                       <none>       4d2r9stcyy2qq5c1
Also: if you ever need to look up just one mailbox workspace by SyncTarget name, you could do it as follows.
GUILDER_WS=$(kubectl get Workspace -o json | jq -r '.items | .[] | .metadata | select(.annotations ["edge.kubestellar.io/sync-target-name"] == "guilder") | .name')
echo The guilder mailbox workspace name is $GUILDER_WS
FLORIN_WS=$(kubectl get Workspace -o json | jq -r '.items | .[] | .metadata | select(.annotations ["edge.kubestellar.io/sync-target-name"] == "florin") | .name')
echo The florin mailbox workspace name is $FLORIN_WS
Register KubeStellar-Syncer on the target clusters#
Once KubeStellar setup is done, KubeStellar-Syncer can be deployed on the target cluster easily by the following steps.
For the target cluster of guilder,#
Go to inventory management workspace and find the mailbox workspace name.
kubectl ws root:imw1
kubectl get SyncTargets
kubectl get synctargets.edge.kubestellar.io
kubectl describe synctargets.edge.kubestellar.io guilder
#kubectl describe Synctarget guilder
mbws=`kubectl get synctargets.edge.kubestellar.io guilder -o jsonpath="{.metadata.annotations['kcp\.io/cluster']}-mb-{.metadata.uid}"`
echo "mailbox workspace name = $mbws"
Current workspace is "root:imw1".
mailbox workspace name = vosh9816n2xmpdwm-mb-bf1277df-0da9-4a26-b0fc-3318862b1a5e
Go to the mailbox workspace and run the following command to obtain yaml manifests to bootstrap KubeStellar-Syncer.
kubectl ws root:$mbws
./bin/kubectl-kubestellar-syncer_gen guilder --syncer-image quay.io/kubestellar/syncer:v0.2.2 -o guilder-syncer.yaml
Current workspace is "root:vosh9816n2xmpdwm-mb-bf1277df-0da9-4a26-b0fc-3318862b1a5e".
Creating service account "kubestellar-syncer-guilder-wfeig2lv"
Creating cluster role "kubestellar-syncer-guilder-wfeig2lv" to give service account "kubestellar-syncer-guilder-wfeig2lv"

1. write and sync access to the synctarget "kubestellar-syncer-guilder-wfeig2lv"
2. write access to apiresourceimports.

Creating or updating cluster role binding "kubestellar-syncer-guilder-wfeig2lv" to bind service account "kubestellar-syncer-guilder-wfeig2lv" to cluster role "kubestellar-syncer-guilder-wfeig2lv".

Wrote WEC manifest to guilder-syncer.yaml for namespace "kubestellar-syncer-guilder-wfeig2lv". Use

  KUBECONFIG=<workload-execution-cluster-config> kubectl apply -f "guilder-syncer.yaml"

to apply it. Use

  KUBECONFIG=<workload-execution-cluster-config> kubectl get deployment -n "kubestellar-syncer-guilder-wfeig2lv" kubestellar-syncer-guilder-wfeig2lv

to verify the syncer pod is running.
Current workspace is "root:espw".
Deploy the generated yaml manifest to the target cluster.
namespace/kubestellar-syncer-guilder-wfeig2lv created
serviceaccount/kubestellar-syncer-guilder-wfeig2lv created
secret/kubestellar-syncer-guilder-wfeig2lv-token created
clusterrole.rbac.authorization.k8s.io/kubestellar-syncer-guilder-wfeig2lv created
clusterrolebinding.rbac.authorization.k8s.io/kubestellar-syncer-guilder-wfeig2lv created
secret/kubestellar-syncer-guilder-wfeig2lv created
deployment.apps/kubestellar-syncer-guilder-wfeig2lv created
Check that the syncer is running, as follows.
NAMESPACE                             NAME                                  READY   UP-TO-DATE   AVAILABLE   AGE
kubestellar-syncer-guilder-saaywsu5   kubestellar-syncer-guilder-saaywsu5   1/1     1            1           52s
kube-system                           coredns                               2/2     2            2           35m
local-path-storage                    local-path-provisioner                1/1     1            1           35m
For the target cluster of florin,#
Go to inventory management workspace and find the mailbox workspace name.
kubectl ws root:imw1
mbws=`kubectl get synctargets.edge.kubestellar.io florin -o jsonpath="{.metadata.annotations['kcp\.io/cluster']}-mb-{.metadata.uid}"`
echo "mailbox workspace name = $mbws"
Current workspace is "root:imw1".
mailbox workspace name = vosh9816n2xmpdwm-mb-bb47149d-52d3-4f14-84dd-7b64ac01c97f
Go to the mailbox workspace and run the following command to obtain yaml manifests to bootstrap KubeStellar-Syncer.
kubectl ws root:$mbws
./bin/kubectl-kubestellar-syncer_gen florin --syncer-image quay.io/kubestellar/syncer:v0.2.2 -o florin-syncer.yaml
Current workspace is "root:vosh9816n2xmpdwm-mb-bb47149d-52d3-4f14-84dd-7b64ac01c97f".
Creating service account "kubestellar-syncer-florin-32uaph9l"
Creating cluster role "kubestellar-syncer-florin-32uaph9l" to give service account "kubestellar-syncer-florin-32uaph9l"

 1. write and sync access to the synctarget "kubestellar-syncer-florin-32uaph9l"
 2. write access to apiresourceimports.

Creating or updating cluster role binding "kubestellar-syncer-florin-32uaph9l" to bind service account "kubestellar-syncer-florin-32uaph9l" to cluster role "kubestellar-syncer-florin-32uaph9l".

Wrote WEC manifest to florin-syncer.yaml for namespace "kubestellar-syncer-florin-32uaph9l". Use

  KUBECONFIG=<workload-execution-cluster-config> kubectl apply -f "florin-syncer.yaml"

to apply it. Use

  KUBECONFIG=<workload-execution-cluster-config> kubectl get deployment -n "kubestellar-syncer-florin-32uaph9l" kubestellar-syncer-florin-32uaph9l

to verify the syncer pod is running.
Current workspace is "root:espw".
Deploy the generated yaml manifest to the target cluster.
namespace/kubestellar-syncer-florin-32uaph9l created
serviceaccount/kubestellar-syncer-florin-32uaph9l created
secret/kubestellar-syncer-florin-32uaph9l-token created
clusterrole.rbac.authorization.k8s.io/kubestellar-syncer-florin-32uaph9l created
clusterrolebinding.rbac.authorization.k8s.io/kubestellar-syncer-florin-32uaph9l created
secret/kubestellar-syncer-florin-32uaph9l created
deployment.apps/kubestellar-syncer-florin-32uaph9l created
Check that the syncer is running, as follows.
NAMESPACE                             NAME                                  READY   UP-TO-DATE   AVAILABLE   AGE
kubestellar-syncer-florin-32uaph9l    kubestellar-syncer-florin-32uaph9l    1/1     1            1           42s
kube-system                           coredns                               2/2     2            2           41m
local-path-storage                    local-path-provisioner                1/1     1            1           41m
Teardown the environment#
To remove the example usage, delete the IMW and WMW and kind clusters run the following commands:
rm florin-syncer.yaml guilder-syncer.yaml || true
kubectl ws root
kubectl delete workspace example-imw
kubectl kubestellar remove wmw example-wmw
kind delete cluster --name florin
kind delete cluster --name guilder
Teardown of KubeStellar depends on which style of deployment was used.
Teardown bare processes#
The following command will stop whatever KubeStellar controllers are running.
Stop and uninstall KubeStellar and kcp with the following command:
Teardown Kubernetes workload#
With kubectl configured to manipulate the hosting cluster, the following command will remove the workload that is kcp and KubeStellar.
Deep-dive#
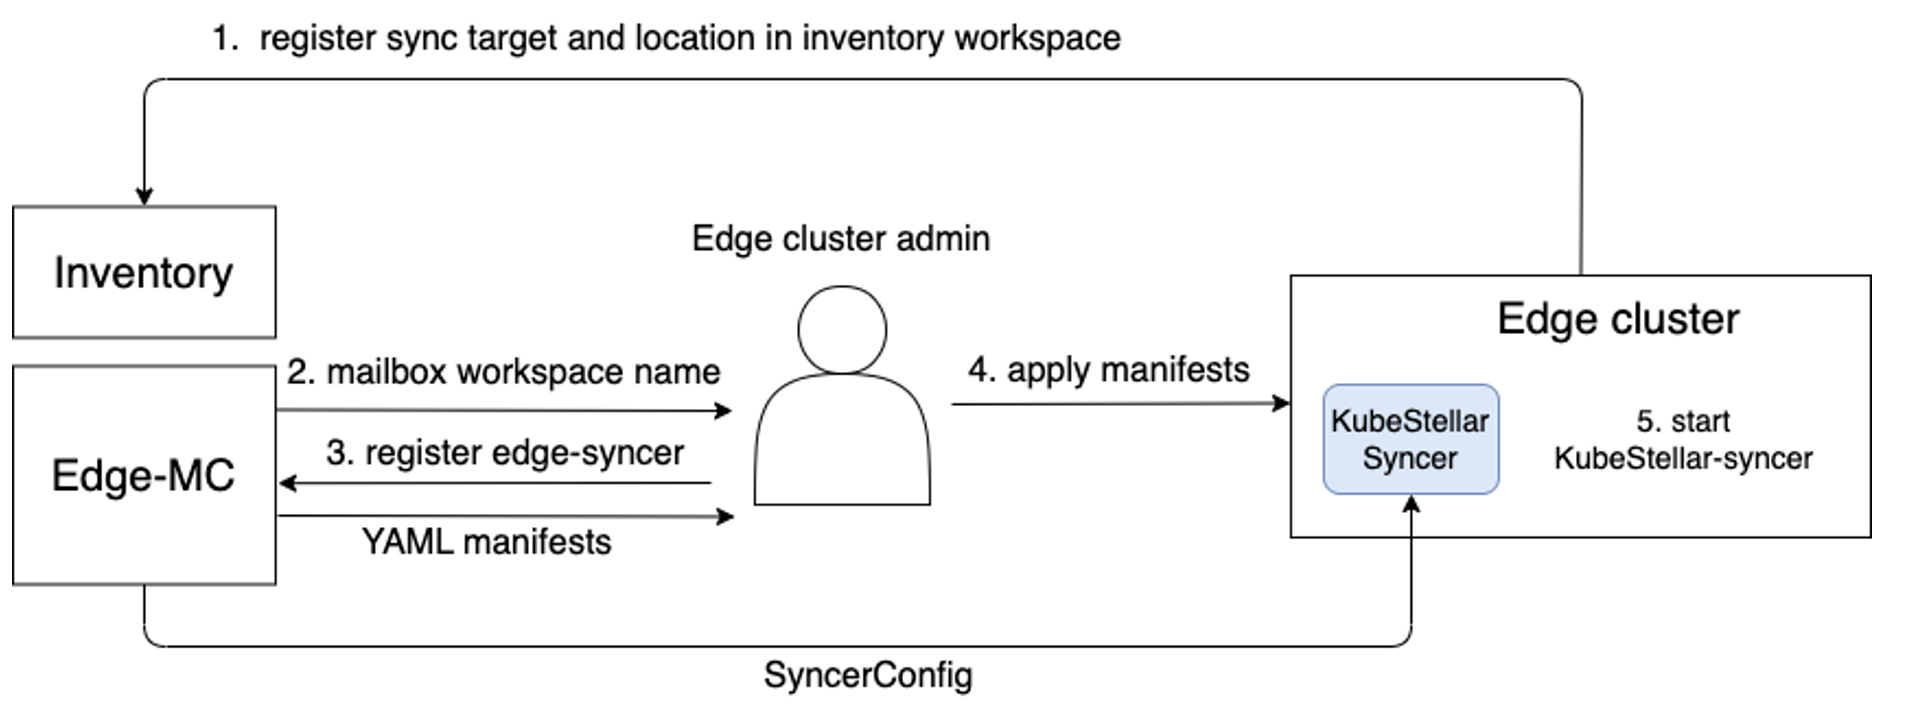
The details about the registration of KubeStellar-Syncer on an Edge cluster and a workspace#
KubeStellar-Syncer is deployed on an Edge cluster easily by the following steps.
- Create SyncTarget and Location
- Mailbox controller creates the mailbox workspace automatically
- Get the mailbox workspace name
- Use the following command to obtain yaml manifests to bootstrap KubeStellar-Syncer
Here,
kubectl ws <mb-ws name> bin/kubectl-kubestellar-syncer_gen <Edge Sync Target name> --syncer-image <KubeStellar-Syncer image> -o kubestellar-syncer.yamlbin/kubectl-kubestellar-syncer_genrefers to a special variant of KubeStellar's kubectl plugin that includes the implementation of the functionality needed here. This variant, under the special name shown here, is a normal part of thebinof KubeStellar. For the KubeStellar-Syncer image, please select an official image from https://quay.io/repository/kubestellar/syncer?tab=tags. For example,--syncer-image quay.io/kubestellar/syncer:git-08289ea05-clean. You can also create a syncer image from the source following Build KubeStellar-Syncer Image. - Deploy KubeStellar-Syncer on an Edge cluster
- Syncer starts to run on the Edge cluster
- KubeStellar-Syncer starts watching and consuming SyncerConfig
The overall diagram is as follows:
What KubeStellar syncer-gen plugin does#
In order for Syncer to sync resources between upstream (workspace) and downstream (workload execution cluster), access information for both is required.
For the upstream access, Syncer's registration command (kubectl kubestellar syncer-gen) creates a ServiceAccount, ClusterRole, and ClusterRoleBinding in the workspace, and then generates a kubeconfig manifest from the ServiceAccount token, KCP server URL, and the server certificates. The kubeconfig manifest is embedded in a secret manifest and the secret is mounted to /kcp/ in Syncer pod. The command generates such deployment manifest as Syncer reads /kcp/ for the upstream Kubeconfig.
On the other hand, for the downstream part, in addition to the deployment manifest, the command generates a ServiceAccount, Role/ClusterRole, RoleBinding/ClusterRoleBinding for Syncer to access resources on the WEC. These resources for the downstream part are the resources to be deployed to the downstream cluster. The ServiceAccount is set to serviceAccountName in the deployment manifest.
Note: In addition to that, the command creates an EdgeSyncConfig CRD if it does not exist, and creates a default EdgeSyncConfig resource with the name specified in the command (kubectl kubestellar syncer-gen <name>). The default EdgeSyncConfig is no longer needed since Syncer now consumes all EdgeSyncConfigs in the workspace. Furthermore, creation of the EdgeSyncConfig CRD will also no longer be needed since we will switch to using SyncerConfig rather than EdgeSyncConfig in near future.
The source code of the command is https://github.com/kubestellar/kubestellar/blob/release-0.14/pkg/cliplugins/kubestellar/syncer-gen/edgesync.go.
The equivalent manual steps are as follows:
Generate UUID for Syncer identification.
Go to a workspace.
Create the following APIBinding in the workspace (Note that in the case of mailbox workspaces, it's done by mailbox controller at creating the mailbox workspace.)
cat << EOL | kubectl apply -f -
apiVersion: apis.kcp.io/v1alpha1
kind: APIBinding
metadata:
  name: bind-espw
spec:
  reference:
    export:
      path: root:espw
      name: edge.kubestellar.io
EOL
Create a serviceaccount in the workspace.
Create clusterrole and clusterrolebinding to bind the serviceaccount to the role.
cat << EOL | kubectl apply -f -
apiVersion: rbac.authorization.k8s.io/v1
kind: ClusterRole
metadata:
  name: $syncer_id
rules:
- apiGroups: ["*"]
  resources: ["*"]
  verbs: ["*"]
- nonResourceURLs: ["/"]
  verbs: ["access"]
---
apiVersion: rbac.authorization.k8s.io/v1
kind: ClusterRoleBinding
metadata:
  name: $syncer_id
roleRef:
  apiGroup: rbac.authorization.k8s.io
  kind: ClusterRole
  name: $syncer_id
subjects:
- apiGroup: ""
  kind: ServiceAccount
  name: $syncer_id
  namespace: default
EOL
Get the serviceaccount token that will be set in the upstream kubeconfig manifest. NOTE This part is outdated due to the recent denaturing of ServiceAccounts in kcp workspaces; the syncer-gen plugin will actually wait a little while and then create the Secret if nothing else has.
secret_name=`kubectl get secret -o custom-columns=":.metadata.name"| grep $syncer_id`
token=`kubectl get secret $secret_name -o jsonpath='{.data.token}' | base64 -d`
Get the certificates that will be set in the upstream kubeconfig manifest.
Get server_url that will be set in the upstream kubeconfig manifest.
server_url=`kubectl config view --minify --raw | yq ".clusters[0].cluster.server" | sed -e 's|https://\(.*\):\([^/]*\)/.*|https://\1:\2|g'`
Set some other parameters. a. downstream_namespace where Syncer Pod runs
b. Syncer imageDownload manifest template.
curl -LO https://raw.githubusercontent.com/kubestellar/kubestellar/main/pkg/syncer/scripts/kubestellar-syncer-bootstrap.template.yaml
Generate manifests to bootstrap KubeStellar-Syncer.
syncer_id=$syncer_id cacrt=$cacrt token=$token server_url=$server_url downstream_namespace=$downstream_namespace image=$image envsubst < kubestellar-syncer-bootstrap.template.yaml
---
apiVersion: v1
kind: Namespace
metadata:
  name: kubestellar-syncer-9ee90de6-eb76-4ddb-9346-c4c8d92075e1
---
apiVersion: v1
kind: ServiceAccount
metadata:
...
Deploy workload objects from KubeStellar to Edge cluster#
To deploy resources to Edge clusters, create the following in workload management workspace - workload objects - Some objects are denatured if needed. - Other objects are as it is - APIExport/API Schema corresponding to CRD such as Kubernetes ClusterPolicyReport. - TBD: Conversion from CRD to APIExport/APISchema could be automated by using MutatingAdmissionWebhook on workload management workspace. This automation is already available (see the script here). - EdgePlacement
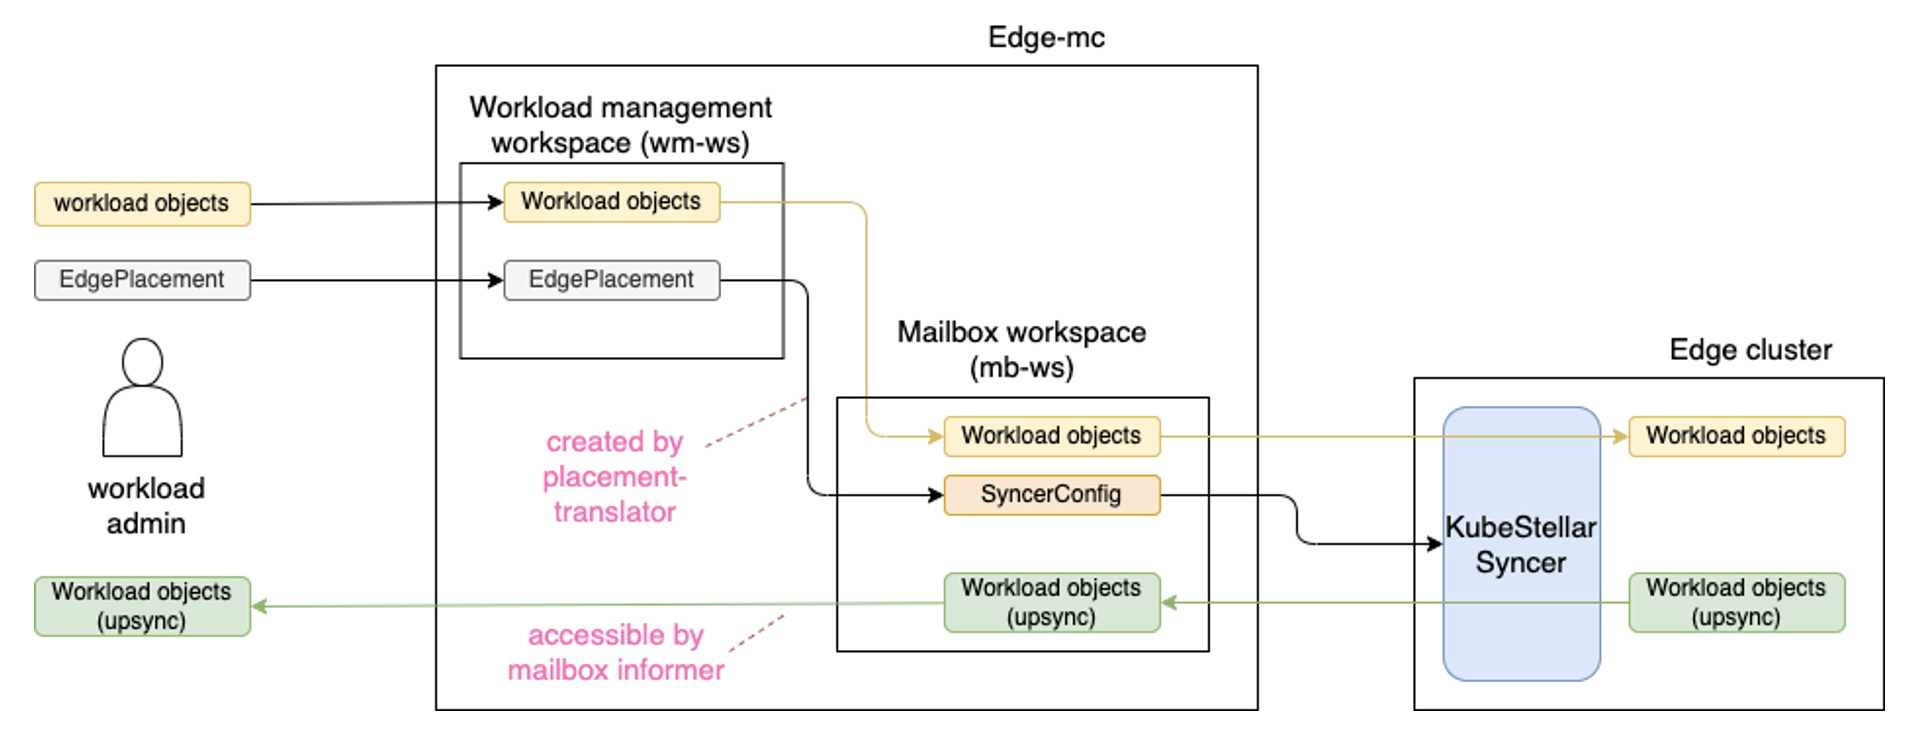
After this, KubeStellar will put the following in the mailbox workspace. - Workload objects (both denatured one and not-denatured one) - SyncerConfig CR
TODO: This is something we should clarify..e.g. which existing controller(s) in KubeStellar will cover, or just create a new controller to handle uncovered one. @MikeSpreitzer gave the following suggestions. - The placement translator will put the workload objects and syncer config into the mailbox workspaces. - The placement translator will create syncer config based on the EdgePlacement objects and what they match. - The mailbox controller will put API Binding into the mailbox workspace.
EdgeSyncConfig (will be replaced to SyncerConfig)#
- The example of EdgeSyncConfig CR is here. Its CRD is here.
- The CR here is used from edge syncer.
- The CR is placed at mb-ws to define
- object selector
- need of renaturing
- need of returning reported states of downsynced objects
- need of delete propagation for downsyncing
- The CR is managed by KubeStellar (placement transformer).
- At the initial implementation before KubeStellar side controller become ready, we assume SyncerConfig is on workload management workspace (WDS), and then which will be copied into mb-ws like other workload objects.
- This should be changed to be generated according to EdgePlacement spec.
- This CR is a placeholder for defining how KubeStellar-Syncer behaves, and will be extended/split/merged according to further design discussion.
- One CR is initially created by the command for KubeStellar-Syncer enablement in mb-ws (
kubectl kubestellar syncer-gen <name>) - The CR name is
<name>and the contents are empty. - This name is registered in the bootstrap manifests for KubeStellar-Syncer install and KubeStellar-Syncer is told to watch the CR of this name.
- Currently KubeStellar-Syncer watches all CRs in the workspace
- KubeStellar-Syncer merges them and decides which resources are down/up synced based on the merged information.
- This behavior may be changed to only watching the default CR once Placement Translator is to be the component that generates the CR from EdgePlacement: related issue
SyncerConfig#
- The spec is defined in https://github.com/kubestellar/kubestellar/blob/release-0.14/pkg/apis/edge/v2alpha1/syncer-config.go
namespaceScopefield is for namespace scoped objects.namespacesis field for which namespaces to be downsynced.resourcesis field for what resource's objects in the above namespaces are downsynced. All objects in the selected resource are downsynced.
clusterScopefield is for cluster scoped objects- It's an array of
apiVersion,group,resource, andobjects. objectscan be specified by wildcard (*) meaning all objects.
- It's an array of
upsyncfield is for upsynced objects including both namespace and cluster scoped objects.- It's an array of
apiGroup,resources,namespaces, andnames. apiGroupis group.resourcesis an array of upsynced resource.namespacesis an array of namespace for namespace objects.namesis an array of upsynced object name. Wildcard (*) is available.
- It's an array of
- The example CR is https://github.com/kubestellar/kubestellar/blob/release-0.14/test/e2e/kubestellar-syncer/testdata/kyverno/syncer-config.yaml
- The CR is used from KubeStellar-Syncer
- The CR is placed in mb-ws to define
- object selector
- need of renaturing (May not scope in PoC2023q1)
- need of returning reported states of downsynced objects (May not scope in PoC2023q1)
- need of delete propagation for downsyncing (May not scope in PoC2023q1)
- The CR is managed by KubeStellar (placement translator).
- At the initial implementation before KubeStellar side controller become ready, we assume SyncerConfig is on workload management workspace (WDS), and then which will be copied into mb-ws like other workload objects.
- This should be changed to be generated according to EdgePlacement spec.
- This CR is a placeholder for defining how KubeStellar-Syncer behaves, and will be extended/split/merged according to further design discussion.
- Currently KubeStellar-Syncer watches all CRs in the workspace
- KubeStellar-Syncer merges them and decides which resources are down/up synced based on the merged information.
Downsyncing#
- KubeStellar-Syncer does downsyncing, which copy workload objects on mailbox workspace to Edge cluster
- If workload objects are deleted on mailbox workspace, the corresponding objects on the Edge cluster will be also deleted according to SyncerConfig.
- SyncerConfig specifies which objects should be downsynced.
- object selector: group, version, kind, name, namespace (for namespaced objects), label, annotation
- Cover cluster-scope objects and CRD
- CRD needs to be denatured if downsyncing is required. (May not scope in PoC2023q1 since no usage)
- Renaturing is applied if required (specified in SyncerConfig). (May not scope in PoC2023q1 since no usage)
- Current implementation is using polling to detect changes on mailbox workspace, but will be changed to use Informers.
Renaturing (May not scope in PoC2023q1 since no usage)#
- KubeStellar-Syncer does renaturing, which converts workload objects to different forms of objects on a Edge cluster.
- The conversion rules (downstream/upstream mapping) is specified in SyncerConfig.
- Some objects need to be denatured.
- CRD needs to be denatured when conflicting with APIBinding.
Return of reported state#
- KubeStellar-Syncer return the reported state of downsynced objects at Edge cluster to the status of objects on the mailbox workspace periodically.
- TODO: Failing to returning reported state of some resources (e.g. deployment and service). Need more investigation.
- reported state returning on/off is configurable in SyncerConfig. (default is on)
Resource Upsyncing#
- KubeStellar-Syncer does upsyncing resources at Edge cluster to the corresponding mailbox workspace periodically.
- SyncerConfig specifies which objects should be upsynced from Edge cluster.
- object selector: group, version, kind, name, namespace (for namespaced objects), label, annotation (, and more such as ownership reference?)
- Upsyncing CRD is out of scope for now. This means when upsyncing a CR, corresponding APIBinding (not CRD) is available on the mailbox workspace. This limitation might be revisited later.
- ~Upsynced objects can be accessed from APIExport set on the workload management workspace bound to the mailbox workspace (with APIBinding). This access pattern might be changed when other APIs such as summarization are provided in KubeStellar.~ => Upsynced objects are accessed through Mailbox informer.
Feasibility study#
We will verify if the design described here could cover the following 4 scenarios. - I can register a KubeStellar-Syncer on a Edge cluster to connect a mailbox workspace specified by name. (KubeStellar-Syncer registration) - I can deploy Kyverno and its policy from mailbox workspace to Edge cluster just by using manifests (generated from Kyverno helm chart) rather than using OLM. (workload deployment by KubeStellar-Syncer's downsyncing) - I can see the policy report generated at Edge cluster via API Export on workload management workspace. (resource upsyncing by KubeStellar-Syncer) - I can deploy the denatured objects on mailbox workspace to Edge cluster by renaturing them automatically in KubeStellar-Syncer. (workload deployment by renaturing)
Build KubeStellar-Syncer image#
Prerequisite - Install ko (https://ko.build/install/)
How to build the image in your local#
make build-kubestellar-syncer-image-locale.g.$ make build-kubestellar-syncer-image-local 2023/04/24 11:50:37 Using base distroless.dev/static:latest@sha256:81018475098138883b80dcc9c1242eb02b53465297724b18e88591a752d2a49c for github.com/kubestellar/kubestellar/cmd/syncer 2023/04/24 11:50:38 Building github.com/kubestellar/kubestellar/cmd/syncer for linux/arm64 2023/04/24 11:50:39 Loading ko.local/syncer-273dfcc28dbb16dfcde62c61d54e1ca9:c4759f6f841075649a22ff08bdf4afe32600f8bb31743d1aa553454e07375c96 2023/04/24 11:50:40 Loaded ko.local/syncer-273dfcc28dbb16dfcde62c61d54e1ca9:c4759f6f841075649a22ff08bdf4afe32600f8bb31743d1aa553454e07375c96 2023/04/24 11:50:40 Adding tag latest 2023/04/24 11:50:40 Added tag latest kubestellar-syncer image: ko.local/syncer-273dfcc28dbb16dfcde62c61d54e1ca9:c4759f6f841075649a22ff08bdf4afe32600f8bb31743d1aa553454e07375c96ko.local/syncer-273dfcc28dbb16dfcde62c61d54e1ca9:c4759f6f841075649a22ff08bdf4afe32600f8bb31743d1aa553454e07375c96is the image stored in your local Docker registry.
You can also set a shell variable to the output of this Make task.
For example
How to build the image with multiple architectures and push it to Docker registry#
make build-kubestellar-syncer-image
The behavior can be modified with some make variables; their default values are what get used in a normal build. The variables are as follows.
DOCKER_REPO,IMAGE_TAG: the built multi-platform manifest will be pushed to$DOCKER_REPO:$IMAGE_TAG. The default forDOCKER_REPOisquay.io/kubestellar/syncer. The default forIMAGE_TAGis the concatenation of: "git-", a short ID of the current git commit, "-", and either "clean" or "dirty" depending on whatgit statushas to say about it. It is STRONGLY recommended to NOT overrideIMAGE_TAGunless the override also identifies the git commit and cleanliness, as this tag is the ONLY place that this is recorded (for the sake of reproducable builds, thego buildcommand is told to not include git and time metadata). To add tags, use your container runtime's and/or image registry's additional functionality.SYNCER_PLATFORMS: a comma-separated list ofdocker build"platforms". The default is "linux/amd64,linux/arm64,linux/s390x".ADDITIONAL_ARGS: a word that will be added into theko buildcommand line. The default is the empty string.
For example,
$ make build-kubestellar-syncer-image DOCKER_REPO=quay.io/mspreitz/syncer SYNCER_PLATFORMS=linux/amd64,linux/arm64
2023/11/06 13:46:15 Using base cgr.dev/chainguard/static:latest@sha256:d3465871ccaba3d4aefe51d6bb2222195850f6734cbbb6ef0dd7a3da49826159 for github.com/kubestellar/kubestellar/cmd/syncer
2023/11/06 13:46:16 Building github.com/kubestellar/kubestellar/cmd/syncer for linux/amd64
2023/11/06 13:46:16 Building github.com/kubestellar/kubestellar/cmd/syncer for linux/arm64
2023/11/06 13:46:43 Publishing quay.io/mspreitz/syncer:git-a4250b7ee-dirty
2023/11/06 13:46:44 pushed blob: sha256:250c06f7c38e52dc77e5c7586c3e40280dc7ff9bb9007c396e06d96736cf8542
2023/11/06 13:46:44 pushed blob: sha256:24e67d450bd33966f28c92760ffcb5eae57e75f86ce1c0e0266a5d3c159d1798
2023/11/06 13:46:44 pushed blob: sha256:cd93f0a485889b13c1b34307d8dde4b989b45b7ebdd1f13a2084c89c87cb2fbf
2023/11/06 13:46:44 pushed blob: sha256:aa2769d82ae2f06035ceb26ce127c604bc0797f3e9a09bfc0dc010afff25d5c6
2023/11/06 13:46:44 pushed blob: sha256:9ac3b3732a57658f71e51d440eba76d27be0fac6db083c3e227585d5d7b0be94
2023/11/06 13:46:44 pushed blob: sha256:512f2474620de277e19ecc783e8e2399f54cb2669873db4b54159ac3c47a1914
2023/11/06 13:46:44 pushed blob: sha256:f2ae5118c0fadc41f16d463484970c698e9640de5d574b0fd29d4065e6d92795
2023/11/06 13:46:44 pushed blob: sha256:836fc9b0d92a362f818a04d483219a5254b4819044506b26d2a78c27a49d8421
2023/11/06 13:46:44 pushed blob: sha256:74256082c076ec34b147fa439ebdafffb10043cb418abe7531c49964cc2e9376
2023/11/06 13:46:44 quay.io/mspreitz/syncer:sha256-905d0fda05d7f9312c0af44856e9af5004ed6e2369f38b71469761cb3f9da2d1.sbom: digest: sha256:d40e5035236f888f8a1a784c4c630998dd92ee66c1b375bf379f1c915c4f296d size: 374
2023/11/06 13:46:44 Published SBOM quay.io/mspreitz/syncer:sha256-905d0fda05d7f9312c0af44856e9af5004ed6e2369f38b71469761cb3f9da2d1.sbom
2023/11/06 13:46:44 quay.io/mspreitz/syncer:sha256-18045f17222f9d0ec4fa3f736eaba891041d2980d1fb8c9f7f0a7a562172c9e5.sbom: digest: sha256:cad30541f2af79b74f87a37d284fa508fefd35cb130ee35745cfe31d85318fe9 size: 373
2023/11/06 13:46:44 Published SBOM quay.io/mspreitz/syncer:sha256-18045f17222f9d0ec4fa3f736eaba891041d2980d1fb8c9f7f0a7a562172c9e5.sbom
2023/11/06 13:46:44 quay.io/mspreitz/syncer:sha256-25d71940766653861e3175feec34fd2a6faff4f4c4f7bd55784f035a860d3be2.sbom: digest: sha256:877daabfb8593ce25c377446f9ec07782eb89b1ff15afdf9a2dfe882b7f87b06 size: 374
2023/11/06 13:46:44 Published SBOM quay.io/mspreitz/syncer:sha256-25d71940766653861e3175feec34fd2a6faff4f4c4f7bd55784f035a860d3be2.sbom
2023/11/06 13:46:45 pushed blob: sha256:0757eb0b6bd5eb800545762141ea55fae14a3f421aa84ac0414bbf51ffd95509
2023/11/06 13:46:45 pushed blob: sha256:9b50f69553a78acc0412f1fba1e27553f47a0f1cc76acafaad983320fb4d2edd
2023/11/06 13:46:54 pushed blob: sha256:15df213e4830817c1a38d97fda67c3e8459c17bc955dc36ac7f2fbdea26a12d4
2023/11/06 13:46:54 quay.io/mspreitz/syncer@sha256:905d0fda05d7f9312c0af44856e9af5004ed6e2369f38b71469761cb3f9da2d1: digest: sha256:905d0fda05d7f9312c0af44856e9af5004ed6e2369f38b71469761cb3f9da2d1 size: 1211
2023/11/06 13:46:54 pushed blob: sha256:6144db4c37348e2bdba9e850652e46f260dbab377e4f62d29bcdb84fcceaca00
2023/11/06 13:46:55 quay.io/mspreitz/syncer@sha256:25d71940766653861e3175feec34fd2a6faff4f4c4f7bd55784f035a860d3be2: digest: sha256:25d71940766653861e3175feec34fd2a6faff4f4c4f7bd55784f035a860d3be2 size: 1211
2023/11/06 13:46:55 quay.io/mspreitz/syncer:git-a4250b7ee-dirty: digest: sha256:18045f17222f9d0ec4fa3f736eaba891041d2980d1fb8c9f7f0a7a562172c9e5 size: 986
2023/11/06 13:46:55 Published quay.io/mspreitz/syncer:git-a4250b7ee-dirty@sha256:18045f17222f9d0ec4fa3f736eaba891041d2980d1fb8c9f7f0a7a562172c9e5
echo KO_DOCKER_REPO=quay.io/mspreitz/syncer GOFLAGS=-buildvcs=false ko build --platform=linux/amd64,linux/arm64 --bare --tags git-a4250b7ee-dirty  ./cmd/syncer
KO_DOCKER_REPO=quay.io/mspreitz/syncer GOFLAGS=-buildvcs=false ko build --platform=linux/amd64,linux/arm64 --bare --tags git-a4250b7ee-dirty ./cmd/syncer
quay.io/mspreitz/syncer:git-a4250b7ee-dirty@sha256:18045f17222f9d0ec4fa3f736eaba891041d2980d1fb8c9f7f0a7a562172c9e5
The last line of the output shows the full image reference, including both tag and digest of the "image" (technically it is a multi-platform manifest).
Teardown the environment#
To remove the example usage, delete the IMW and WMW and kind clusters run the following commands:
rm florin-syncer.yaml guilder-syncer.yaml || true
kubectl ws root
kubectl delete workspace example-imw
kubectl kubestellar remove wmw example-wmw
kind delete cluster --name florin
kind delete cluster --name guilder
Teardown of KubeStellar depends on which style of deployment was used.
Teardown bare processes#
The following command will stop whatever KubeStellar controllers are running.
Stop and uninstall KubeStellar and kcp with the following command:
Teardown Kubernetes workload#
With kubectl configured to manipulate the hosting cluster, the following command will remove the workload that is kcp and KubeStellar.